Audience: CMS Users, Event Organizers
Import sessions, speakers, abstracts, ePosters, handouts, evaluation links, and optional credit assignments from Planstone into the Conference App Builder. Create a separate source for each data set.
TABLE OF CONTENTS
- Planstone API - Before Getting Started
- Choose a Planstone V2 source
- Setting Up the Initial Data Sources and Running the Initial Import
- Filters
- Credit Assignments
- Incremental Imports after Setup
- FAQ
- I have made changes in Planstone and imported but I am not seeing the content updated?
- What triggers which sessions / presentations are imported into EventPilot from Planstone?
- I am unable to import my filter keywords - I am seeing an error that field length is exceeded?
- What are the Planstone session (parent) and presentation (child) IDs in the EventPilot platform?
- How do I remove a session from EventPilot?
- In my speaker list, I am seeing a speaker called Break - how do I remove that?
- Which uploaded handouts are included?
- Can I import handouts that are not linked to an imported presentation?
- Are PowerPoint handouts included?
- How are the handout title and label generated?
- How is the handout icon chosen?
- Why is a handout missing from its presentation?
Planstone API - Before Getting Started
In order to set up new data sources that connect with the Planstone API, you will need to contact Planstone to receive the following:
- The API base URL (it could look similar to this https://apps.planion.com/feed/v1)
- Your Planstone Account Code (this is likely your organization name)
- The conference name in Planstone (this could look like ABCD2024)
- Get confirmation that Planstone added ATIV's user account to the project on the Planstone side.
Once you have received the details, you will be able to set up Import Sources in the Conference app builder.
Access the menu item in the Conference App Builder where you would like to import data:
Agenda for session data
Speakers for presenters
Media for abstracts
Choose a Planstone V2 source
Use the V2 source for every Planstone import:
- Planstone V2 for Sessions or Speakers.
- Planstone Abstracts V2 for abstracts.
- Planstone ePosters V2 for ePoster files and available audio.
- Planstone Handouts V2 for presentation handouts.
- Planstone Deeplinks V2 for evaluation links.
- Planstone CE Credits V2 for credit assignments.
Setting Up the Initial Data Sources and Running the Initial Import
Speakers
- Access the Conference App Builder (From our website, choose Organizer Login > EventPilot on the top right)
- Select your project
- Navigate to Agenda > Speakers
- Click Add Import Source (note: you may need to click the carrot to expand the import card before this button is visible)
- Enter a logical name for the source to indicate where this import is coming from e.g. Planstone API
- Tip: we recommend including the Planstone event ID in the name. When you clone your project in the future, you'll then easily know if you need to update your import source.
- Select Planstone V2from the Source dropdown
- Select Next
- As prompted on the screen, enter:
- Planstone Account Code
- Planstone Conference Code
- In Subsession Roles Without Speaker (optional) enter a comma separated list of the speaker roles where you do not want speaker entries generated. For example, Break or Q&A.
If you have used import customizations in the past, ask your ATIV Project Manager to add your Custom Code (optional) (generally your ORG ID in the App Builder) or Custom Import Parameters
Select Next
Complete the field mapping. Common mappings include:
Speaker IDto Speaker IDFirst Nameto First NameLast Nameto Last Name. UseLast Name with Degreeinstead to append the degree.Companyto OrganizationBioto BioEmailto Private Email (not displayed in the app).Imageto Photo. UseFull Size Imageinstead when preferred.Countryto an available filter field if needed.Mediato Media Items for associated abstracts and ePosters. Handouts link to presentations, not speaker Media lists.
Next to run the import
If there are errors in your data, review: Common Conference App Builder Import Data Errors and Import Exclusion Reasons
Sessions
- Navigate to Agenda > Sessions
- Click Add Import Source (note: you may need to click the carrot to expand the import card before this button is visible)
- Enter a logical name for the source to indicate where this import is coming from e.g. Planstone API
- Tip: we recommend including the Planstone event ID in the name. When you clone your project in the future, you'll then easily know if you need to update your import source.
- Select Planstone V2from the Source dropdown
- Select Next
- As prompted on the screen, enter:
- Planstone Account Code
- Planstone Conference Code
If you have used import customizations in the past, ask your ATIV Project Manager to add your Custom Code (optional) (generally your ORG ID in the App Builder) or Custom Import Parameters
If you wish to display Learning Objectives in the session detail view, click on Include Learning Objectives in Description and select Yes
Add which speaker roles should be included to display in parent sessions as a comma separated list e.g. Moderator,Discussion Leader, etc.
Optional: If you wish to import CE types to display in Filter 3 (via mapping in the next step), select the type of credits e.g. CME,CE,MOC (add as a comma separated list)
Select Next
Complete the field mapping. Common mappings include:
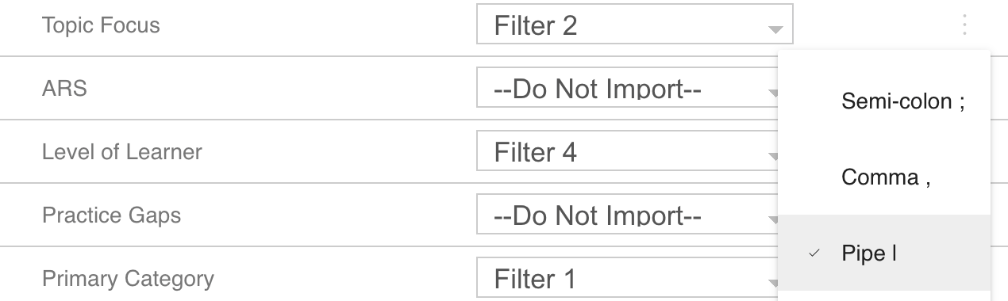
Session IDto Session IDSession Numberto Session Number to preserve presentation ordering.Session Titleto Session Title. A presentation with an empty title in Planstone does not create a child session.Session Typeto Session TypeDateto DateStart Timeto Start TimeEnd Timeto End TimeLocationto Location. UseRoom Nameinstead for the room name alone. Commas are removed and colons replaced with hyphens for location compatibility.Descriptionto Description. UseDescription plus locationinstead to repeat the location in the description.Parent Sessionto Parent SessionSpeakersto Speaker IDCMEto Filter 3 for available credit types.Additional track or category columnsto appropriate available filter fields, such as Filter 1 or Filter 2.- For Planstone track and filter keyword fields, set the delimiter to the pipe symbol
|. Click the hamburger menu next to the mapping and select the pipe delimiter.
Click Next to run the import
If there are errors in your data, review: Common Conference App Builder Import Data Errors and Import Exclusion Reasons
Keep Subsession Roles Without Speaker (optional) consistent in Sessions and Speakers. Select Use Parent Times For Invalid Subsession Times: Yes to use the parent’s times when a presentation has an empty start or end time, or identical start and end times.
Abstracts (Media)
- Navigate to Media > Media Data
- Click Add Import Source (note: you may need to click the carrot to expand the import card before this button is visible)
- Enter a logical name for the source to indicate where this import is coming from e.g. Planstone Abstracts V2
- Tip: we recommend including the Planstone event ID in the name. When you clone your project in the future, you'll then easily know if you need to update your import source.
- Select Planstone Abstracts V2from the Source dropdown
- Select Next
- As prompted on the screen, enter:
- Planstone Account Code
- Planstone Conference Code
- Optional
- Embargo: If you don't have embargo dates on abstracts in Planstone, you can set a default embargo date for all abstracts, you can set the date using this format yyyy-mm-dd for example: 2027-09-26
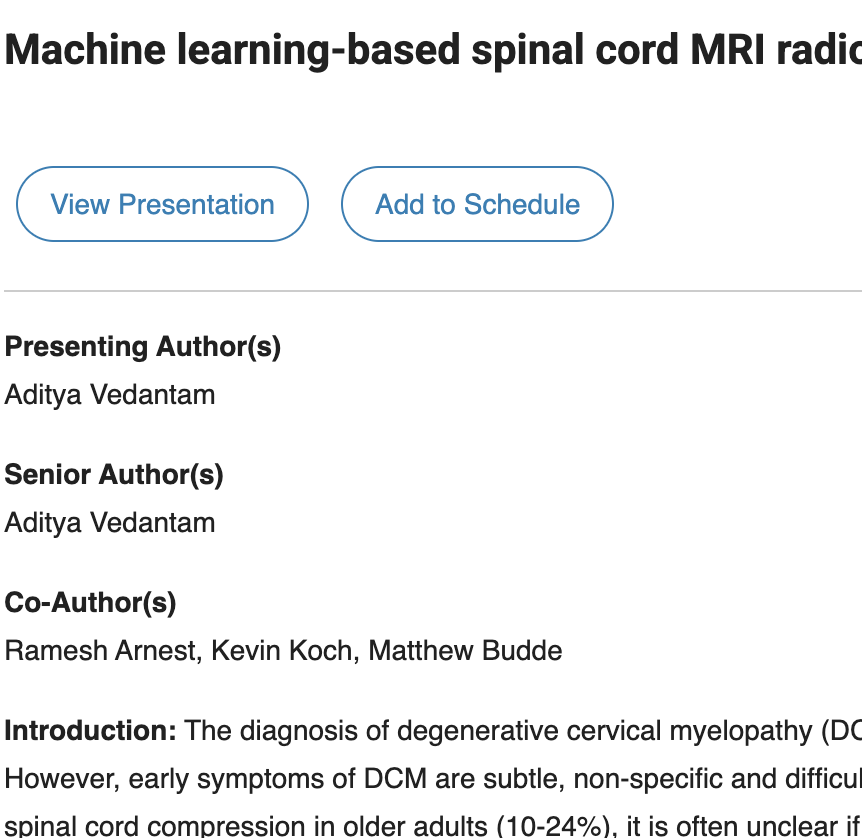
- Display Presentation & Schedule Buttons: if your abstracts are linked to presentation sessions that users could add to their schedule, select Yes.
If you have used import customizations in the past, ask your ATIV Project Manager to add your Custom Code (optional) (generally your ORG ID in the App Builder) or Custom Import Parameters
Select Next
Complete the field mapping. Common mappings include:
Media IDto Media IDSession IDto Session ID to link the item to its presentation.Titleto TitleDefault Subtitleto SubtitleTypeto Media TypeDescriptionto DescriptionMediaType Filterto Filter 4 to identify Abstract items.Embargoto Start for a per-abstract release date.Default Embargoto Start instead when using the conference-wide date entered in Embargo Date (optional).Topicto an available filter field, such as Filter 2.- Keep
Session IDmapped to Session ID so the abstract appears on its presentation. Leave Import Without Associated Session set to No unless you also want otherwise eligible abstracts without a published agenda association.
A per-abstract embargo requires the Planstone
form_data_embargo_releasefield. Ask your ATIV Project Manager if Planstone uses a different field.For Planstone track and filter keyword fields, set the delimiter to the pipe symbol
|. Click the hamburger menu next to the mapping and select the pipe delimiter.Next to run the import
If there are errors in your data, review: Common Conference App Builder Import Data Errors and Import Exclusion Reasons
Handouts (Media)
Use a separate Planstone Handouts V2 source to import eligible presentation handouts. See the FAQ for publication requirements, supported formats, and how titles and icons are chosen.
- Go to Media > Media Data.
- Select Add Import Source. Expand the import card if needed.
- Enter a recognizable name, such as Planstone Handouts ABCD2026. Including the conference code helps identify sources after cloning a project.
- Select Planstone Handouts V2 from Source, then select Next.
- Enter the Planstone Account Code and Planstone Conference Code.
- Leave Import Without Associated Session set to No to import only handouts linked to a presentation that qualifies for the published agenda. Select Yes only if you also want eligible handouts with no imported presentation association.
- Use Custom Code (optional) and Custom Import Parameters (optional) only when your ATIV Project Manager provides instructions.
- Select Next and complete the field mapping. Common mappings include:
Media IDto Media IDSession IDto Session ID to link the handout to its presentation. Keep this field mapped so the handout appears on the correct presentation.Titleto TitleDefault Subtitleto Subtitle, for example Handout - pdf.Typeto Media Type. Leave the alternateType 2field unmapped unless ATIV advises otherwise.URLto URLIconto HTML IconMediaType Filterto Filter 4 to identify these items as Handout.
- Select Next to run the import and review the Results for errors or excluded records.
- Import the related Sessions source as well. Publish to proof and verify that each handout appears on the correct presentation and opens the expected file. Publish live after review.
ePosters (Media)
ePoster PDFs and available audio files uploaded to Planstone are imported as separate media items and linked to their presentations.
- Navigate to Media > Media Data
- Click Add Import Source (note: you may need to click the carrot to expand the import card before this button is visible)
- Enter a logical name for the source to indicate where this import is coming from e.g. Planstone ePosters V2
- Tip: we recommend including the Planstone event ID in the name. When you clone your project in the future, you'll then easily know if you need to update your import source.
- Select Planstone ePosters V2from the Source dropdown
- Select Next
- As prompted on the screen, enter:
- Planstone Account Code
- Planstone Conference Code
If you have used import customizations in the past, ask your ATIV Project Manager to add your Custom Code (optional) (generally your ORG ID in the App Builder) or Custom Import Parameters
Select Next
Complete the field mapping. Common mappings include:
Media IDto Media IDSession IDto Session ID to link the item to its presentation.Titleto TitleDefault Subtitleto SubtitleTypeto Media TypeIconto HTML IconURLto URLMediaType Filterto Filter 4 to distinguish ePoster and ePoster Audio items.Topicto an available filter field when supplied by a matching published abstract.Default Embargoto Start when using Embargo Date (optional).- Keep
Session IDmapped to Session ID. Leave the alternateType 2andType 3fields unmapped unless ATIV advises otherwise.
For Planstone track and filter keyword fields, set the delimiter to the pipe symbol
|. Click the hamburger menu next to the mapping and select the pipe delimiter.Next to run the import
If there are errors in your data, review: Common Conference App Builder Import Data Errors and Import Exclusion Reasons
Leave Import Without Associated Session set to No unless you also want otherwise eligible ePosters without a published agenda association.
Evaluation Deeplinks (Media)
This import is links to the Planstone Evaluation Module. If you are using this module, ensure to contact your Planstone account manager to activate the mobileActionURL for the API. Work with your Planstone Account Manager to set this up a Session Group called "Mobile Evaluation". Your Account Manager will import "Yes" for this field on all sessions that have an evaluation attached.
- Navigate to Media > Media Data
- Click Add Import Source (note: you may need to click the carrot to expand the import card before this button is visible)
- Enter a logical name for the source to indicate where this import is coming from e.g. Planstone Deeplinks V2
- Tip: we recommend including the Planstone event ID in the name. When you clone your project in the future, you'll then easily know if you need to update your import source.
- Select Planstone Deeplinks V2from the Source dropdown
- Select Next
- As prompted on the screen, enter:
- Planstone Account Code
- Planstone Conference Code
If you have used import customizations in the past, ask your ATIV Project Manager to add your Custom Code (optional) (generally your ORG ID in the App Builder) or Custom Import Parameters
Select Next
Complete the field mapping. Common mappings include:
Media IDto Media IDTitleto TitleSubtitleto SubtitleTypeto Media TypeIconto HTML IconURLto URLSession IDto Session ID to associate the evaluation link with qualifying sessions.
Next to run the import
If there are errors in your data, review: Common Conference App Builder Import Data Errors and Import Exclusion Reasons
In the Data step, set Link Title, Link Subtitle, and optional Link Icon to control the evaluation media item’s appearance.
Filters
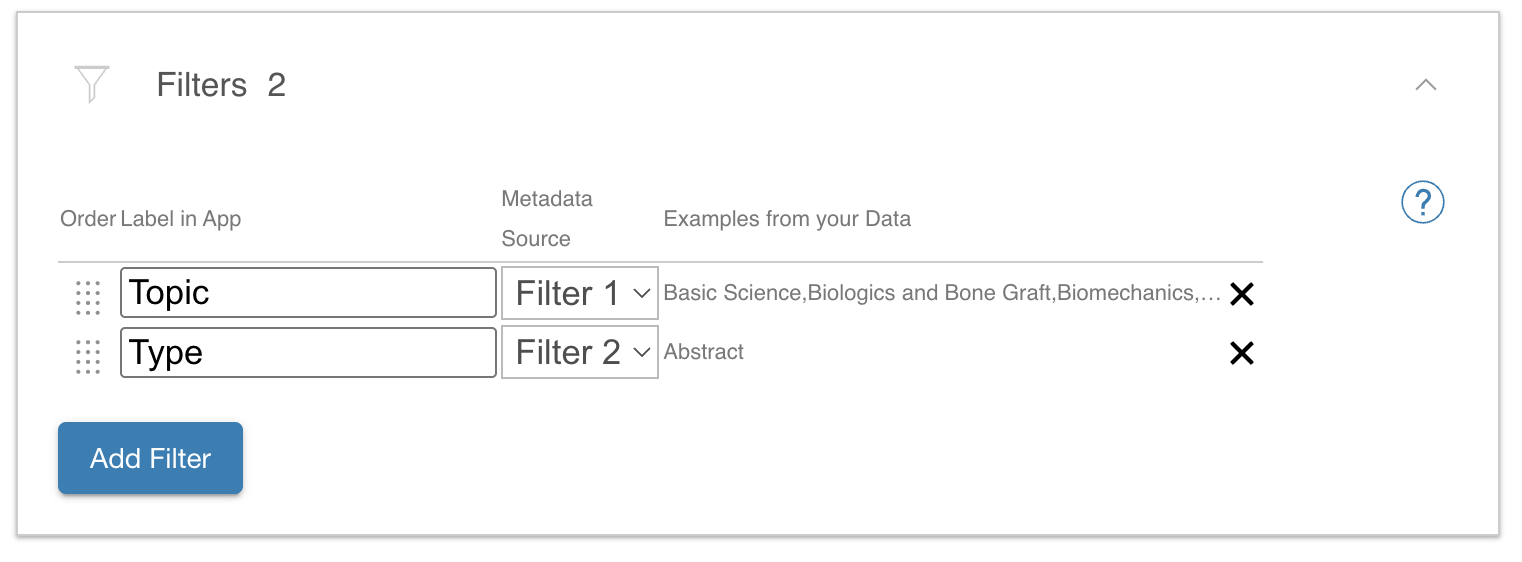
If you are importing filter keywords, ensure to open the filter card to:
- set the filter label
- adjust the filter display order
Credit Assignments
If you are using the Credit Certificate add-on, you can import the credit assignments directly.
- Navigate to Add Ons > Credits
- On the Session Credits page, click Add Import Source (note: you may need to click the carrot to expand the import card before this button is visible)
- Enter a logical name for the source to indicate where this import is coming from e.g. Planstone CE
- Tip: we recommend including the Planstone event ID in the name. When you clone your project in the future, you'll then easily know if you need to update your import source.
- Select Planstone CE Credits V2from the Source dropdown
- Select Next
- As prompted on the screen, enter:
- Planstone Account Code
- Planstone Conference Code
- Optional CE Types
For example, you may have CME and CNE and CME-Pharma listed in Planstone. But you only offer a CME certificate. In that case, enter CME in that field and only CME credit amounts will be imported.
Select Next
Complete the field mapping. Common mappings include:
Session IDto Session IDCredit Typeto Cert Name. The credit label, such as CME, associates the matching certificate.Number of Creditsto Num Credits
- Select Next
Incremental Imports after Setup
- Return to the Conference App Builder, log in, and access your project
- You have three different import options:
- Import all at once
Select the Home menu > Import All Data - Import one data set (e.g. just speakers or just sessions or just media)
To import all sources for a given table individually, visit that page of the Conference App Builder (e.g. Agenda > Sessions) and choose Import All [Agenda] - Import one source only
To import just one single source, visit that page of the Conference App Builder (e.g. Agenda > Sessions), expand the import card if necessary, and select the Import button beside a single data source
Note: If you manually import individual sources, ensure to import all related sources (Sessions, Speakers, Media) or you may be seeing orphans errors.
- Import all at once
- If there are errors in your data, review this article: Common Conference App Builder Import Data Errors and Import Exclusion Reasons
- Select the Publish Menu on the top left and Publish to Proof
- After reviewing your data update in the proof version on iOS and Android, you may publish to live by selecting Publish Live Data
Note: If you are using the credit certificate, the Session Credit import is NOT included in the Import All. Please visit the page Add Ons > Credits and click Import on that page in order to update credit
FAQ
I have made changes in Planstone and imported but I am not seeing the content updated?
Changes must first be available through the Planstone API. V2 imports also reuse downloaded data for up to 10 minutes. Once that copy is older than 10 minutes, the next import requests fresh data; this is not a background refresh on a fixed schedule. Re-run the related sources after allowing time for the update, then review and publish the changes. If an update is still missing, ask Planstone whether it is available in the API.
What triggers which sessions / presentations are imported into EventPilot from Planstone?
The parent session must have Published set to true. A presentation must also have its own presentation/speaker record published and a non-empty presentation title. Project-specific import rules may exclude additional session types or records.
I am unable to import my filter keywords - I am seeing an error that field length is exceeded?
During field mapping, the default delimiter is a comma. However, in Planstone data, the delimiter is a pipe symbol |. After selecting the metadata field to map to, the delimiter must be changed to the | symbol.
What are the Planstone session (parent) and presentation (child) IDs in the EventPilot platform?
For parent sessions the Planstone Id field is "schedid" and for presentations (child) sessions, it is the "pslinkid" field.
How do I remove a session from EventPilot?
Set the Published field in Planstone to false and then reimport your data into EventPilot.
In my speaker list, I am seeing a speaker called Break - how do I remove that?
In Planstone, all sessions have a speaker role so on import, a speaker entry gets generated for that role. In order to stop the system from generating a speaker for a particular role, follow these steps:
- Open Agenda > Speakers
- Expand the Import card and click the edit symbol next to the Planstone import source
- Select Step 2 Data
- In the field Subsession Roles Without Speaker (optional) enter the role you wish to exclude, e.g. Break
- Click the Next button to go to the Mapping step
- Click the Next button to go to Results. If you see any import errors, correct those in Planstone first and then click the Import button in the import card (you do not have to go through the setup steps to import data)
- Refresh the page and confirm that the speaker with the name Break is no longer displaying
- Publish to proof to see the results in the proof version of the app, publish to live to push the update to your attendees
Which uploaded handouts are included?
The standard Planstone Handouts V2 import creates one media item for each qualifying resource on a Planstone presentation’s speaker record. An upload is included only when:
- Its resource type is Handout. Other uploaded resource types are excluded.
- The presentation/speaker record has Published set to true. The importer checks this record’s publication status; it does not check a separate publication flag on the individual handout resource.
- By default, the presentation qualifies for the imported agenda: its parent session is published and allowed by the project’s import rules, and the presentation has a non-empty title. Project customizations may add exclusions.
- The file has a non-empty URL with a supported extension:
png,jpg,jpeg,mp3,mp4,m4a, orpdf. Eligibility uses the extension in the file URL, so an extensionless URL does not qualify.
Can I import handouts that are not linked to an imported presentation?
Yes. Set Import Without Associated Session to Yes in the Handouts source. This allows otherwise eligible handouts with no qualifying agenda presentation, but their Session ID is blank and they will not appear attached to a presentation. The presentation/speaker record must still be published and the file must still pass the Handout type and supported-format checks.
Are PowerPoint handouts included?
A ppt or pptx upload is included through Planstone’s converted PDF URL when one is available. EventPilot links to that converted file, and the subtitle is normally Handout - pdf. If no converted URL is provided, the PowerPoint upload is skipped. EventPilot does not perform the conversion itself.
How are the handout title and label generated?
The Title uses the handout’s publication name (pubname1). If that is blank, it uses the presentation title (cargo); if both are blank, it uses Handout. The Default Subtitle is Handout - followed by the extension of the linked file, for example Handout - pdf or Handout - m4a. Map these fields to Title and Subtitle to display them.
The media filter label is always Handout. Each qualifying upload becomes a separate item, so a presentation may have several handouts.
How is the handout icon chosen?
The Icon uses the thumbnail URL supplied by Planstone (thumbnail_url). If there is no thumbnail and the linked file is a PDF, EventPilot supplies the standard PDF icon. This also applies to PowerPoint uploads linked through their converted PDF. For other supported file types without a thumbnail, the imported Icon field is blank. Map Icon to HTML Icon to use the supplied icon.
Why is a handout missing from its presentation?
Check the Handout resource type, the presentation/speaker record’s Published status, the parent session’s publication status, and the file URL and format. Confirm that Session ID is mapped to Session ID in the Handouts source and that both Sessions and Handouts have been imported. Handouts are not automatically added to speaker profiles. Allow for API availability and the V2 cache described above, then review the import Results and publish the update after proof review.